With a bit of extra space, you can transform your yard into a zen work of art…and a fun spot for kids. A backyard labyrinth can serve not only as a mindfulness activity, but also as a landscaping glow-up! They look beautiful and add loads of interest and texture to an otherwise empty spot in your yard.
At The Backyartisan, we compiled a simple how-to guide, so all you have to do to create your own meditative walking path is gather the materials and muster up your DIY spirit. No David Bowie required! Read below to collect some inspiration and learn how to build your own backyard labyrinth.
What is a Labyrinth?
Labyrinths are similar to mazes, but instead of a confusing puzzle, there is a single walking path that meanders its way to the center – no wrong turns! Usually made to serve as a walking meditation, labyrinths have been used for thousands of years for creative inspiration, ceremony, and mental practice.
No one quite knows when labyrinths first appeared, but their lore originates in Greek and Indian mythology. Designs have been found dating back over 3000 years ago. It is one of the most ancient mindfulness tools known to mankind.
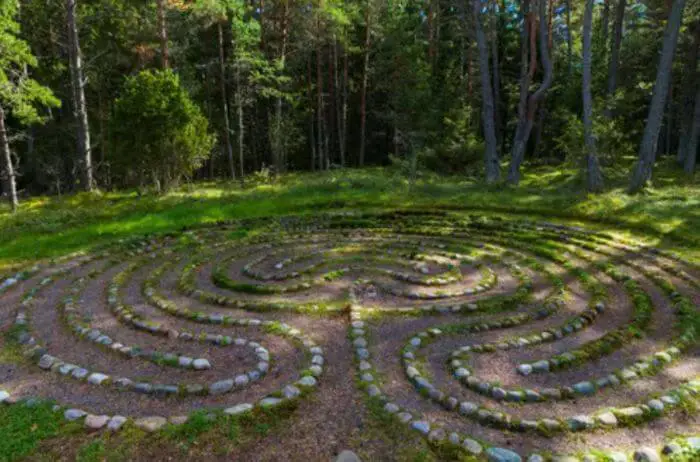
There are countless famous labyrinths around the world. The Chartres Labyrinth in France was crafted in the 1200s on the floor of a cathedral. The Qing Dynasty’s Summer Palace, Yuanmingyuan, in China hosts a labyrinth standing among the ruins of colonial destruction in the 1860s. An 11-circuit labyrinth is perched high upon a San Francisco bluff overlooking Mile Rock Beach and is meticulously maintained by volunteers.
Now, don’t be intimidated by the history of the labyrinth! Yes, they can get quite complicated, but there’s no reason to start with graduate-level designs. With this simple DIY guide, you too can join the ancients and craft your own walking meditation path using simple materials and a bit of planning.
Types of Backyard Labyrinths
Since we’re dealing with a work of art here, let’s get creative! You can build a backyard labyrinth out of anything. DIYers have used materials such as rope, rocks, paint, stone pavers, potted plants, or even branches. Think about what would work best in your yard and what items you have on hand.
Don’t forget to include the kids on this one! Can they help you hammer down stakes? Draw out a practice design? Maybe even plant herbs or low shrubs for a path border? There are plenty of ways that children can assist in this project, and with the act of helping, they’ll be all the more excited to see it completed!
How to Make a Labyrinth In Your Backyard
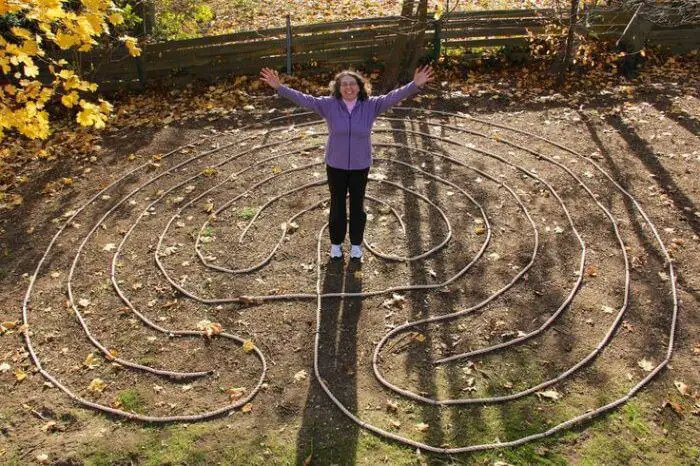
The photo above depicts a 5-circuit rope labyrinth.
This guide will focus on simple directions to craft a 3-circuit labyrinth out of rope. In a 3-circuit style, a person will walk three paths around the labyrinth before reaching the center.
You’ll need:
- A 7-foot diameter empty space in your yard
- About 60 feet of rope, cut into two 30-foot sections
- Measuring tape
- Metal stakes
- Hammer
- Large box of baking soda
- Cotton twine, 4 feet long
It’s a good idea to first draw out your design on a piece of paper before hitting the dirt. You might wish to change the size or direction of your labyrinth based on other factors in your yard. Next, you’ll head outside to make a temporary outline in baking soda before setting up your permanent design. Let’s begin!
Prep:
- Draw out your design on a piece of paper before you head outside.
- Decide on location, materials, and direction.
- Measure out your yard space to ensure you have enough room.
- Gather your materials.
Get started:
Got your box of baking soda? This nontoxic powder will allow you to draw a temporary outline to ensure you’re happy with placement and design before setting up your more permanent borders.
Prep your grid:
The beginning grid of a labyrinth is called a Seed Pattern. Much like a seed, from this center will sprout the winding branches of your walking path!
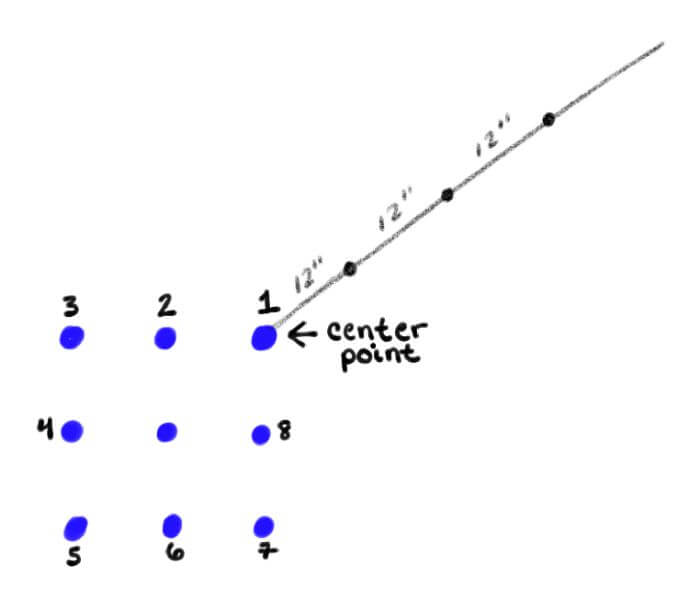
- Place a handful of baking soda where the center of your labyrinth will be.
- From there, place 8 more handfuls of baking soda, spaced 12” apart to create a 3×3 dot grid.
- Gently hammer 8 stakes over each baking soda pile, just slightly into the ground so you can later course your rope through them.
- We’ll name your stakes 1-8 from the center point or upper right (Stake 1) and go counterclockwise. See the photo above for reference.
- Connect the center dots with lines of baking soda to create a crosspoint.
- The entrance & exit of your labyrinth will be between Stake 5 and 6 – the lower left-hand section of your Seed Pattern.
- Make your measuring guide: Attach your cotton twine to your center stake (the upper rightmost stake). Tie four concentric knots 12” apart along the twine. This twine will act as your guide, pivoting from that central point, so you can trace neat and even arches! See the photo above for reference.
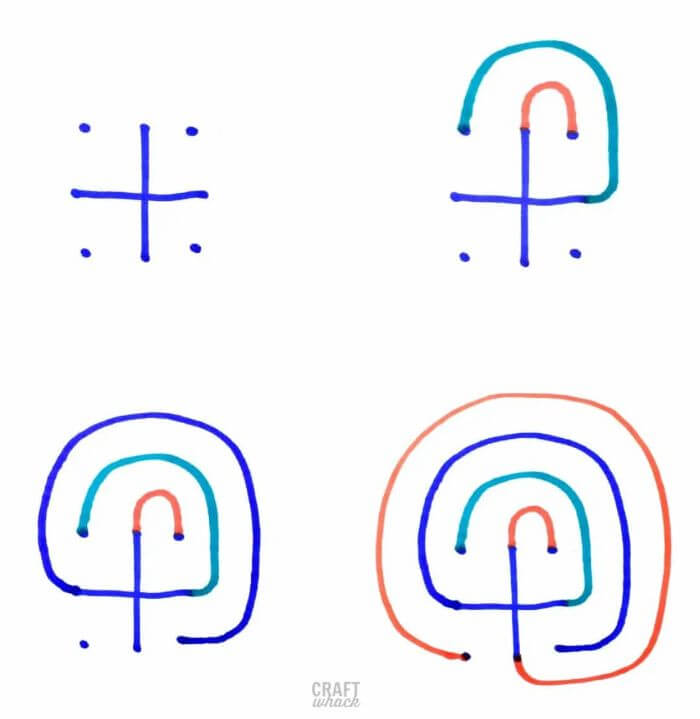
Start connecting your loops:
- Center border: Using the first knot in your twine as a measuring guide, trace a line of baking soda from Stake 1, 12” up, then down to Stake 2.
- Inner border: Next, trace a line of baking soda from Stake 8 to Stake 3, making sure to keep the line 12” from the previous line.
- Middle border: Trace a line of baking soda from Stake 7 to Stake 4.
- Outer border: Trace a line of baking soda from Stake 6 all the way around, counterclockwise, to Stake 5.
You should now have a complete baking soda outline of a 3-circuit labyrinth with a 12” walking path. Go ahead and give it a try! While your design is still a draft, now’s the time to change things before you move on to the next section of the project. Not happy with your draft? Spray it away with the hose and give it another try.
Make your labyrinth:
Now that you have your outline, you can use your rope and metal stakes to make your design more permanent.
- Attach one end of the rope to Stake 1.
- From Stake 1, course your rope along the Outer border, hammering it down with stakes as you go, ending at Stake 5.
- Attach your second piece of rope down to Stake 3 and course your rope along the Inner border and Middle border, hammering it down with stakes as you go, ending at Stake 7.
- Make sure your borders look even – make any adjustments you need.
All done! Hopefully, you found this project just as mentally engaging as you will your new yard art. Read further for a few more tips and guidance on the many ways you can use a labyrinth.
Tips:
- Take your time! Think of this process as an art project – because it is!
- Do you want to go bigger? Try the classic 7-circuit labyrinth style!
- Get creative with building materials and try to use what you already have on hand.
- Short on space in the yard? You can use a tree, boulder, or bench as the center point.
- Have the kids help you with this DIY process. Just learning how to draw a labyrinth can be a meditative and mindful practice.
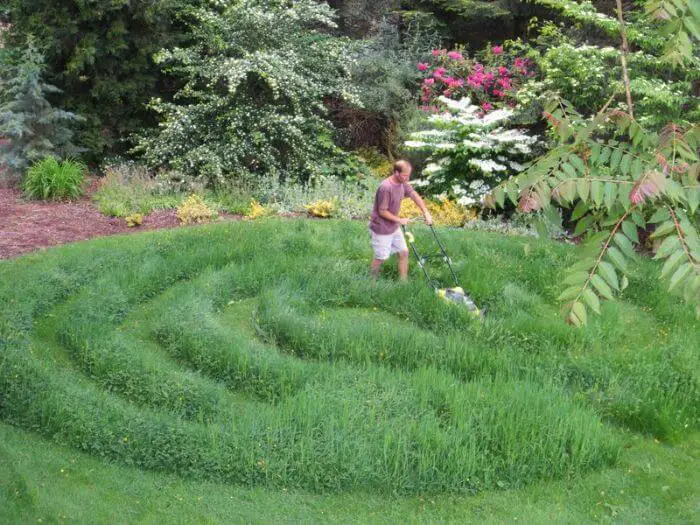
- Need an even easier DIY labyrinth? Simply mow one into your overgrown lawn!
- Decorating for the holidays? Make a string light labyrinth!
How to use a labyrinth:
There is no wrong way to walk a labyrinth! You can use this guided path in any way you choose. The overall arching theme of use is: contemplative. Before entering the path, some people like to think of a problem, a need for inspiration, a burden, or a mantra. Pause at the center of the labyrinth before turning around to weave your way back to the exit.
Go slow, go fast, go backward! Whatever you do, aim for focus and an open mind. A labyrinth can help simplify your surroundings, quiet mental noise, and promote awareness.
Final Comments
Now that your labyrinth is complete, you’ve successfully added a corner of art and purpose to your yard – DIY style! Not only will your kids enjoy this guided walk, but you can also use your labyrinth to invite inner peace and mindfulness. Happy walking!