Power Wheels cars come with so much DIY project potential! Not only can you work simple updates like adding rubber tires or seat belts, but you can also complete the ultimate Power Wheels upgrade…the battery!
If your kid has tired of her slow sidewalk Jeep, this might be the key to getting her re-amped on her wheels. Upgrading the battery of your Power Wheels car is doable, engaging, and certainly pays off.
We’ve outlined a complete guide on how to upgrade your Power Wheels Battery below. So, read on to learn more about this DIY project and add some zoom to your ride!
Can You Upgrade a Power Wheels Battery?
Sure can! There are a few different ways you can upgrade your Power Wheels battery. We’re going to cover it all right here. Your ride-on car came with a 6 or 12-volt battery. You can harness more power potential by adding on extra voltage or replacing the battery completely. Power Wheels batteries only last about 1-3 years, so you’ll need to replace it regularly anyways.
Is a Battery Upgrade Worth It?
Does your kiddo need more speed? Then yes, it’s worth it! Adding some oomph to that battery can add some YAY to their ride. Essentially, it nearly creates an entirely new toy out of an old one. We’re all supportive of re-using what you have, aren’t we?
Not only does a battery upgrade increase your Power Wheels speed, but it also reduces charging time and increases battery lifespan. All this means less waiting and more fun! We’d say that’s worth it.
Check out our other guides on upgrading tires, replacing motors, and modifying electric ride-on cars to go faster for more upgrades you can make.
Is a Battery Upgrade Safe?
For the DIYer
Let’s be honest, this is an electric DIY project. For that reason, you will need to take extra care to complete the work safely. That being said, it is a very safe project to complete! Especially with our careful notes and wiring diagram, you’ll be well prepared for your work.
Install Safety
- Pay attention to polarity!
- Recycle your old battery! Do not throw it in the garbage. Find your nearest battery recycling center to drop it off.
- Overheating battery: To prevent the new and more powerful battery from overheating, it’s advised that you also install overload protection.
- An inline fuse is a valuable addition to protecting against fires that result from overheated engines.
- Heat sinks keep the engine from overheating.
- Battery install: be sure the battery is secured well inside the battery compartment.
- Wire care: exposed wires need to be covered with electrical tape or crimp connectors and always out of access to children.
For the Rider
As discussed, a battery upgrade will increase the speed and power of your ride-on car. Your child should be very comfortable managing the speed that your Power Wheels currently has and should be ready to take on more.
Driver Safety
- Ensure you’re advising your kids on the changes they’ll see in the upgraded Power Wheels before they get behind the wheel.
- Test drive your upgraded vehicle before handing the keys over to the kids!
Install a wheelie bar to help prevent the car from tipping if the accelerator is pushed too quickly!
Battery Options for Upgrades
When it comes to upgrading your child’s Power Wheels battery, you have two options. You can choose to use a lithium-ion battery or a sealed lead acid battery. We’ll discuss the two options in more detail to give you all the info you need to decide.
Lithium-ion batteries offer a lighter weight option and a faster charging time. Using a high-quality brand like Milwaukee universal tool batteries is a great choice for this project. These batteries are widely available from local hardware stores, are very compact, and charge super fast.
Sealed lead acid (SLA) batteries are also a good option. These are the most common stock battery type for ride-on cars. They come with a built-in fuse, so it will eliminate one step in your DIY project. The downside is that they are larger batteries and usually take longer to recharge.
Possible upgrades to a Power Wheels battery:
- Pair two batteries together
- Pair two 6-volt batteries to create a 12-volt battery
- Add a 6-volt to a 12-volt battery
- Install a new single battery
- Upgrade a 6-volt battery to a 12-volt battery
- Upgrade a 12-volt battery to an 18-volt battery
The details for each of these upgrades are described below under the Ready your new battery set up section.
How to Upgrade a Power Wheels Battery
Firstly, decide what type of upgrade to complete, gather your materials, and review the basics of how to connect wire cables.
Gather Your Materials
- New battery of desired voltage- 6, 12, or 18-volts
- USB adapter, if needed for specific battery replacement
- Mounting equipment of choice: screws, adhesive tape, Velcro strips.
- 30-amp Inline fuse
- Motor speed controller
- Crimping pliers
- Wire strippers
- Nylon wire crimp connectors
- Butt connectors for upgrades to SLA battery
- Battery cables for double battery upgrades
- Electrical tape
- Electrical wire
- Flathead screwdriver
- Drill
Let’s Get To Upgrading That Battery!
Step 1: Elevate your Power Wheels
Getting your kiddo car off the ground can give you a bit more space to work with and let you test out the power output in a stationary position after you’re finished with the battery install. Place a small box under the car that still allows the wheels to spin freely.
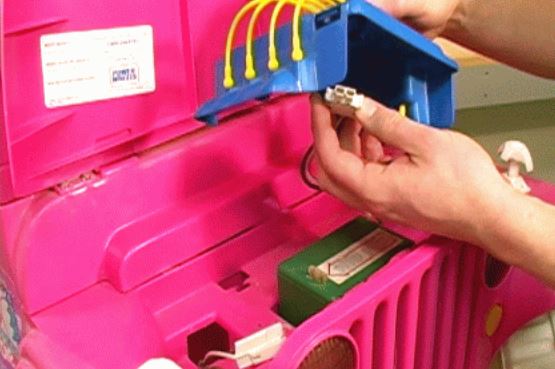
Step 2: Remove the old battery from the Power Wheels
Detach the battery-connected plug from the engine plug. If you are replacing the battery with another SLA battery, that’s all you need to do – move to Step 3. If you’re upgrading to lithium ion, continue on:
Next, we will open up the old battery to preserve the original battery connector. Once you clip those wires, your warranty is voided…so you’re committed to finishing the project!
- Using a flathead screwdriver, pry off the plastic top of the old battery.
- Detach the battery connector and clip the two wires as close to the battery as possible to allow as much wire length on the connector as possible.
Step 3: Ready your new battery set up
Pair two batteries together
You can connect two batteries to each other using two methods: in series or in parallel. Which method you choose will depend on your desired outcome.
You will need lengths of battery cable to complete this task with crimp or bullet connectors.
- In Series: the voltage will be combined and the car can produce faster speeds.
- How to: Connect the negative terminal of battery 1 to the positive terminal of battery 2.
- In Parallel: the amp hour will be combined and the car can run longer before needing to recharge.
- How to: Connect the negative terminal of battery 1 to negative terminal of battery 2. Connect the positive terminal of battery 1 to the positive terminal of battery 2.
You can pair two 6-volt batteries together or join a 6-volt battery with a 12-volt battery. Once your batteries are paired, secure them together with electrical tape or a rubber tie to keep things organized.
Upgrade to a single new battery
Upgrade a 6-volt to a 12-volt battery
If your Power Wheels is on the tiny side and came stock with a 6-volt battery, you can upgrade that! Your limit will go up to a 12-volt SLA battery, as you don’t want to overwork the engine.
Upgrade a 12-volt to an 18-volt battery
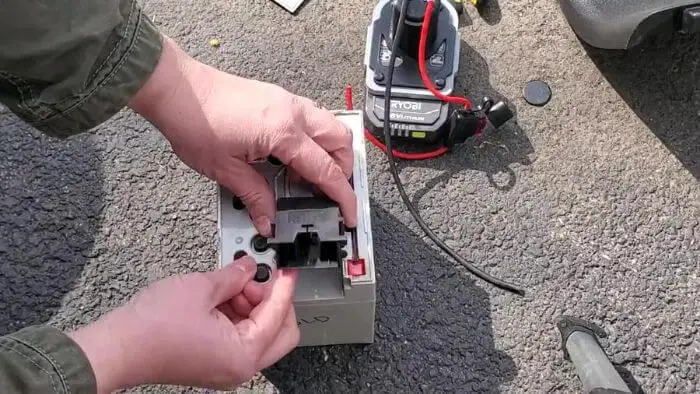
The simplest way to upgrade a single battery to 18-volt is to use a lithium ion battery, like a Milwaukee drill battery, with a USB adapter.
You may need to modify the USB adapter to add cable connection points if it doesn’t already have them.
- Open the adapter to view the battery and connection points.
- Attach two wires to the connection points to serve as your positive and negative wiring. Pay attention to polarity.
Step 4: Connect your inline fuse to the battery or USB adapter
An inline fuse will protect against engine overheating and decrease the risk of fire by creating a break in the system. So, if your battery were to overwork itself, instead of causing damage to the battery, your fuse would pop. It’s far more simple to replace and much safer for the rider!
- Take a look at your inline fuse – are the two ends of the cable connected in a loop? Use a pair of wire cutters to cut it in the middle, creating two wires.
- Connect the inline fuse to the positive wire (the white wire) of your battery or USB adapter with a crimp connector.
Step 5: Install a Motor Speed Controller
The motor speed controller is placed in between the battery and the motor and serves as a parental control point for power output. A small dial on the side allows you to set a voltage limit for power transfer to the motor.
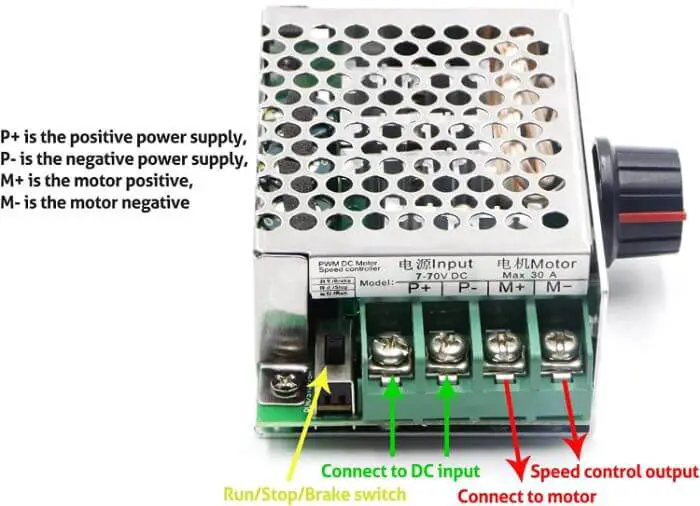
- The battery connector will attach to the terminals labeled MOTOR on the controller.
- The battery itself will attach to the terminals labeled INPUT on the controller.
- In the Test Drive section of this guide, you’ll test the power output and adjust the dial as needed.
Step 6: Install and secure your pieces under the hood
When your electrical circuit is complete, you’re ready to plug the battery connector back into the engine plug under the hood. Before attaching anything, do some puzzling (and measuring…) to figure out how your new battery and other pieces will best fit into the battery compartment.
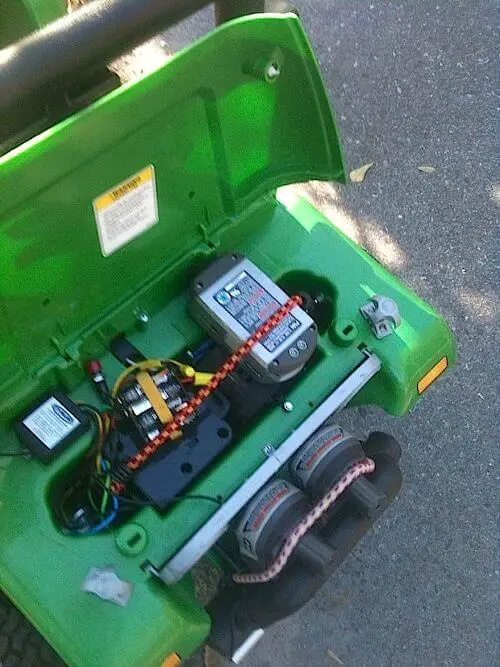
Securely attaching the battery and other items under the hood is a necessary step to ensure safety while driving. On the off chance that your kiddo accidentally rolls or tips the Power Wheels car, items in the hood compartment need to be solidly in place.
Secure a USB Adapter
- Use a drill to screw two holes into the back of the plastic casing of the USB adapter, then drill two matching holes into the plastic of the battery compartment under the hood. Attach via screws.
- You can add a small block of wood behind the plastic compartment for a more secure hold on the USB adapter.
Secure other items or a battery without a USB Adapter
You can secure a battery in its compartment a few different ways. Use a drill to bore holes into the plastic compartment casing for screw attachment, use Velcro or adhesive strips, or rubber cords.
Step 7: Test Drive!
Stationary Test
To start, keep your Power Wheels elevated with the wheels off the ground. With the hood open, you can access the motor speed controller, press the gas pedal and observe the wheel spin. A voltage meter can be helpful here to get a numerical visual on power output. Adjust the speed controller as desired before closing the hood and performing a moving test drive.
In Motion Test
Adult test drive before you allow the kids to hop behind the wheel. Have a seat…as well as you can, at least…in the Power Wheels, and give the gas pedal a gradual push.
If the car kicks up from under you into a wheelie, you’ve got too much power! Adjust that motor speed controller and try again.
When you’re satisfied with the car’s performance, let your kids try it. Watch them closely for the first few drives to ensure the car operates well after the battery upgrade.
Final Comments
Upgrading your ride-on car battery can feel like an impressive task. But with this guide, you have all the information you need to get to work and put the Power into Power Wheels!